Mission Map Pane

Mission Planning Mapping Overview
Map Navigation Controls
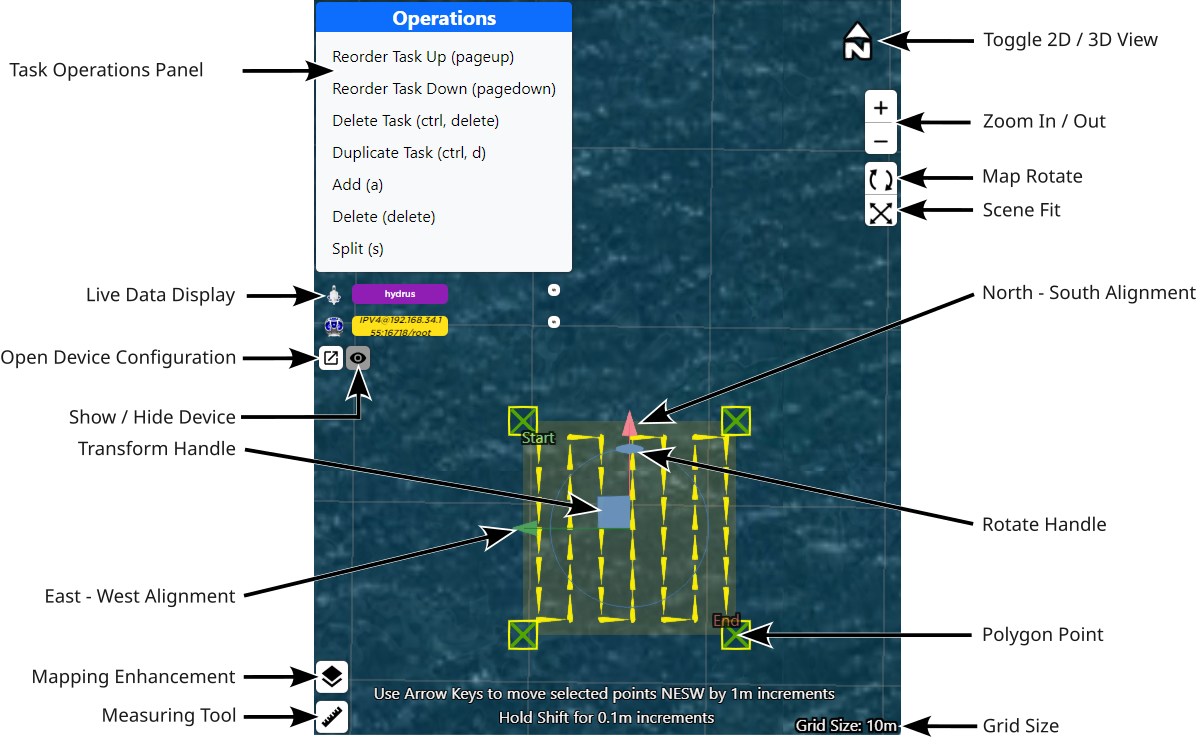
Scene Fit: This tool adjusts the view so that the entire mission scene fits within the viewport. This can also be done by double tapping the space-bar key.
Zoom In/Out: Use these tools for zooming in or zooming out the map view. The mouse roller wheel can also be used for zooming.
Toggle 2D/3D View: This tool switches the view modes between 2D view and 3D view. The 3D view is recommended to get a better sense of the terrain when utilising any mapping enhancements.
Grid Size: Displays the grid scale that overlays the map based on the current zoom level.
Device Tools
These tools are related to device configuration and data display.
Show and Hide Devices: Shows or hides the corresponding devices on the map. This can help reduce clutter and focus on specific devices.
Live Data Display: This feature displays live data from the devices, including roll, pitch, heading, latitude, longitude, and height. This data can help monitoring the status and position of the devices in real time.
Open Device Configuration: This button opens a panel where device settings can be changed, including adding or removing devices and more.
Task and Waypoint Tools
The Mission Map Pane offers a set of tools for creating, moving, rotating and resizing mission tasks and waypoints.
Transform Handle: With this tool it is possible to adjust the position of transect survey tasks and their individual waypoints. For lawnmower tasks, this tool can be used to move the position of the entire task, or change the shape and size of the selected task by selecting and moving its polygon points.
Note: To use the Transform Handle, first select the task in the Mission Planner pane in order for the rotate handle to appear.
Waypoints and Polygon Points: These are the vertices of the mission task. These points can be moved by using the transform handle in order to resize or reshape mission tasks. By selecting multiple polygon points (Ctrl + Click), the transform handle can be used to move several points at the same time. When selecting a single point, its geodetic coordinates are displayed in the Selected Point section of the Mission Planner pane.
Rotate Handle: This tool is used to change the orientation of the selected mission task. By clicking and dragging the oval shaped handle, the task can be rotated around its centre. For lawnmower mission tasks, the orientation can be set manually in the Lawnmower Orientation field in the Path Generation section of the Mission Planner pane.
Note: To use the Rotate Handle, first select the task in the Mission Planner pane in order for the rotate handle to appear.
East/West (Green Arrow) Alignment: This tool allows polygon point realignment along the east-west axis by clicking a point, holding and dragging the green arrow.
North/South (Red Arrow) Alignment: This tool allows polygon point realignment along the north-south axis by clicking a point, holding and dragging the red arrow.
Task Operations Panel

Task Operations Panel
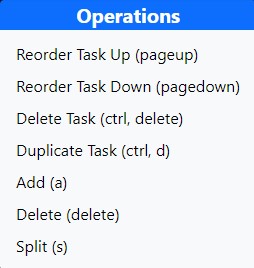
Reorder Task Up (Page Up): This command moves the task up by one step in the list and repositions the task earlier in the execution sequence.
Reorder Task Down (Page Down): This command moves the task down by one step in the list and repositions the task later in the execution sequence.
Delete Task (Ctrl + Del): This command removes the entire mission task that is currently selected.
Note: Exercise caution when using this function. Deleting a mission task cannot be undone.
Duplicate Task (Ctrl + D): This function creates a copy of the selected task directly over the polygon selected for duplication. This is useful when creating similar tasks and speeds up the workflow.
Add (A): This command adds a new polygon point to the selected task. If the user selects the add button from the Task Operations Panel, the new polygon point will appear in the centre of the screen. However, if the user presses the 'A' key on the keyboard, the new point will appear wherever the cursor is currently located.
Delete (Del): This command allows the user to remove a selected polygon point. It's useful when it is needed to adjust the shape of the polygon or transect task by removing unnecessary points.
Split (S): This function enables the user to add a polygon point between two previously selected polygon points. Pressing 'S' on the keyboard will achieve the same outcome as selecting Split in the Task Operations Panel.
Note: To select multiple polygon points, hold down the Ctrl key on your keyboard and click the polygon points.
Measuring Tool
Measuring Tool: This tool allows the user to measure distances on the map. There are two ways to use this tool:
-
Click and drag: By clicking and dragging across the map, the exact distance between two points on the map can be determined.
-
Click once for point A, then click once for point B: Distances can also be measured and displayed by clicking once to set point A, then clicking again to set point B.
The bearing shown is relative to north, providing directional context for the measurement. Additionally, a circle is drawn around the two points, with the radius of the circle representing the measured distance from point A to point B. This visualises the spatial relationship between the two points and can be used for reference purposes.
Mission Summary
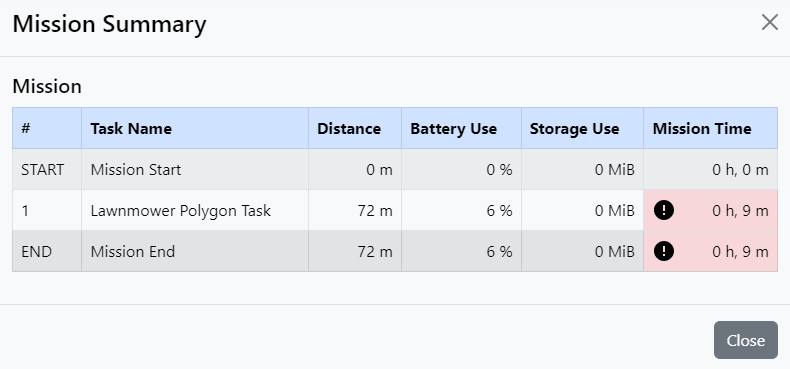
The Mission Summary dialog is a useful tool when planning missions. It gives you an overview of the estimated mission travel distance, battery usage and mission duration. To access the Mission Summary dialog, navigate to Mission Planner → Menu → View Mission Summary....

Mission Planner - Mission Summary
Mission Waypoints
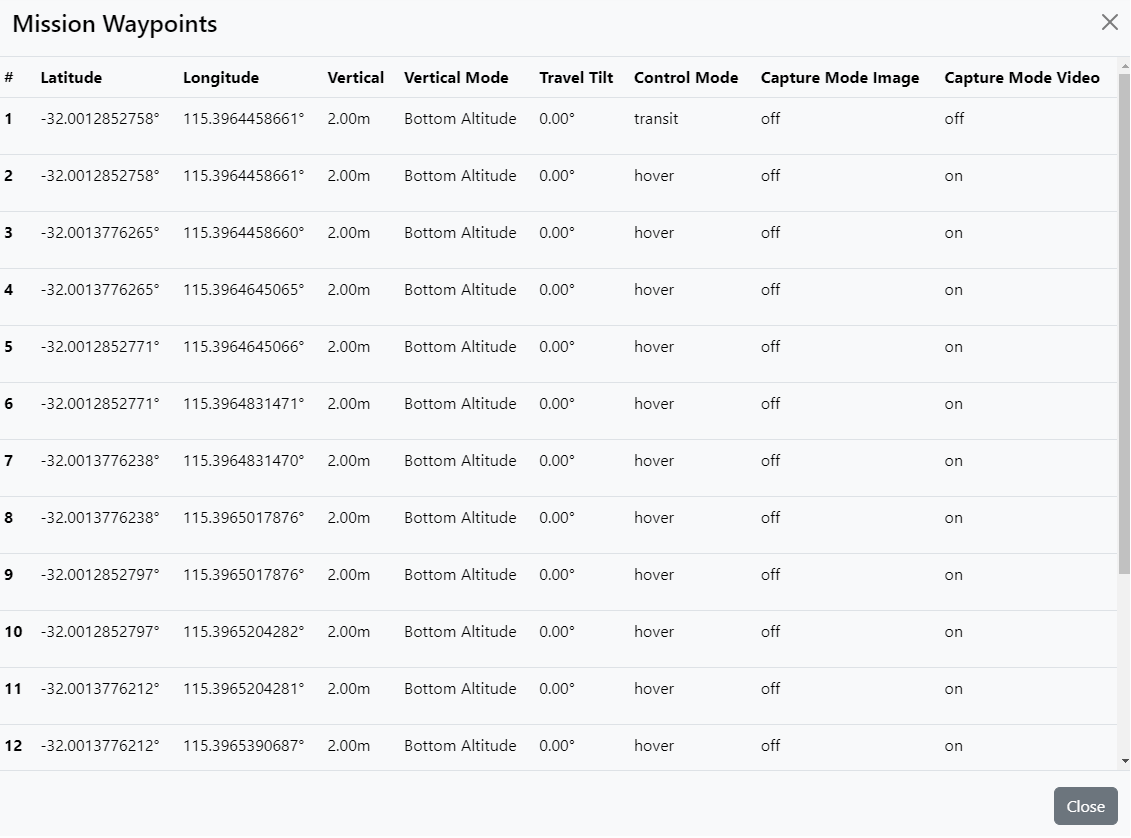
The Mission Waypoints dialog provides an overview of all waypoint coordinates and other mission task parameters for the entire mission. This can be used for reference during mission planning and review. To access the Mission Waypoints dialog, navigate to Mission Planner → Menu → View Execution Waypoints....

Mission Planner - Mission Waypoints